Recovery

The goal of this wiki page is to provide the user with knowledge for higher system reliability, robustness, increases uptime, backup, restoration, recovery and repair skills.
Introduction
[edit]It is prudent to acquire system recovery skills prior to an eventual later grave issue such as an unbootable VM or even unbootable host operating system, data loss or similar. This is because naturally for most users once they are affected by a grave issue, the mind goes into "issue solving mode", which can be stressful and less productive, specifically when it is currently a bad time to acquire these skills due to other more pressing priorities. By learning these skills in advance, one can obtain the skills during a more appropriate time in a much more positive, relaxed environment which might potentially greatly increase a user's ability and lower the time required to fix their broken system, should this happen in the future.
Useful Skills
[edit]- Boot an operating system (OS) from an external USB / DVD boot drive.
- Boot an operating system (OS) from an external USB / DVD boot drive and mount the OS which is installed on the internal hard drive to access or backup its data. [1] Yes, this is also possible when using Full Disk Encryption.
- Remove an internal drive from one computer, move it into a USB enclosure and access its data from a different computer.
- Temporary Kernel Boot Parameter Change using grub bootloader boot menu.
- Permanent Kernel Boot Parameter Configuration Changes.
- Inspect Grub Configuration Changes.
- Raw Disk Backup and Restoration.
- How to boot into recovery mode.
- How to switch to a virtual console in a virtual machine (VM).
- How to switch to a virtual console on the host operating system.
- Enable Persistent Systemd Journal Log
- Check Systemd Journal Log of Previous Boot
- Check Systemd Journal Log of Failed Boot
- hard drive health check (S.M.A.R.T)
- Topics mentioned on the Troubleshooting wiki page.
- Other topics mentioned on this wiki page.
Useful Habits
[edit]- Keep the log of any system upgrades as well as software installation processes.
- Keep one or multiple root virtual terminal tabs in a terminal emulator open during actions which might result in an unbootable system, data loss, inability to access the root account, or other issues during software installation or upgrades. The same goes for one or multiple root virtual consoles. This advice (for higher ability to easily recover from issuing gaining root) conflicts with the general security advice from the root wiki page (for better security).
Recovery Mode
[edit]If an error occurs that prevents Kicksecure from booting, it is possible to try and boot Kicksecure into either:
- A) Linux recovery mode (sometimes called
Single User Mode) to fix the problem.; or - B) Use a dracut emergency shell.
This is possible in many cases but not, for example, if GRUB is broken.
It is advisable to learn how to use recovery mode while everything is still functional in case of future issues.
See also root wiki page, specifically chapters:
| Kernel Parameter | Kicksecure Default Setting | Useful Action for Kernel Parameter | Effect of Action |
|---|---|---|---|
single
|
No | Add | Boots into Linux recovery mode (single-user mode), useful for maintenance or troubleshooting. |
loglevel=0
|
Yes | Remove | Allows kernel to print messages with the default log level, making boot output more verbose. |
quiet
|
Yes | Remove | Disables suppression of boot messages; more details are displayed during boot. |
rd.shell=0
|
Yes | Remove | Re-enables the emergency shell in case of boot failure. |
rd.emergency=halt
|
Yes | Remove | Prevents system from halting on an emergency and instead drops to dracut’s default emergency shell. |
SYSTEMD_SULOGIN_FORCE=1
|
No | Add | Allows root login in dracut recovery shell |
rd.debug
|
No | Add | Enable dracut verbose output. |
rd.break=premount
|
No | Add | Drop to dracut recovery shell prior mounting system disk for example for the purpose of manually running fsck.
|
Choose an option.
Kernel Boot Parameter Single
- Choose from above table. Any adding and/or removing of any kernel parameter is optional.
- Removing the kernel parameters
loglevel=0quietrd.shell=0rd.emergency=haltcan be very useful for debugging. - Adding
singleactivates Linux recovery mode. - Follow the Temporary Kernel Boot Parameter Change instructions to change the kernel parameters for a single boot.
Linux recovery mode boot entry
- Linux recovery mode boot option has been removed from default GRUB boot menu for security and usability reasons

.
- To restore the Linux recovery mode boot entry and re-enable dracut emergency shell, one option would be to delete the
/etc/default/grub.d/41_recovery_restrict.cfg
configuration file. This is of course only possible if the system is still booting (or more complicated, using a chroot). Delete the file responsible for Linux recovery mode disabling: sudo safe-rm -- /etc/default/grub.d/41_recovery_restrict.cfg
- Update GRUB boot menu: sudo update-grub
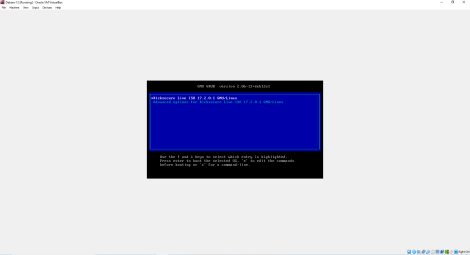
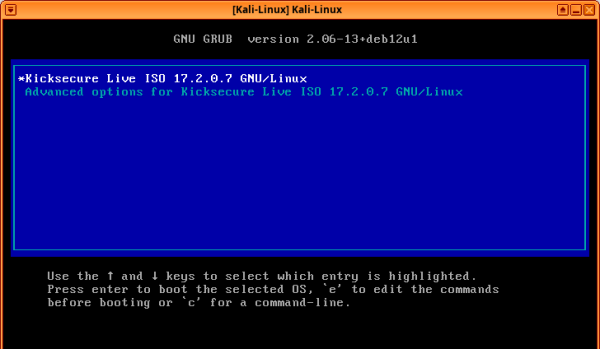
- After powering on Kicksecure, you will see the virtual BIOS for a second, then the grub boot menu. The grub boot menu is easily identified by the first line of text which begins with either
GNU GRUBorChoose boot mode. - Use the arrow keys to navigate and select
Advanced Options for Kicksecure GNU/Linux. - Press
Enter. - Choose the second option which at the end displays
(recovery mode). - Press
Enter. - Somewhere in the output, a message similar to the following will appear (it might be entangled with other debug output):
Give root password for maintenance (Or press control + d to continue):
- Enter the root password.
- While typing, no asterisk symbols (
*) will appear; the password must be typed "blind". [2] - Press
Enter. - The default keyboard layout will be
en-US. To change this setting, see: Keyboard Layout. - Type
exitto continue booting, orpowerofforrebootto shut down or reboot the system.
TODO: Explore whether networking is possible and how to transfer files out of the VM.
Emergency Recovery Console
[edit]Also initramfs-tools users sometimes call this initramfs shell, initramfs prompt or emergency recovery console.
Dracut Emergency Shell
[edit]dracut emergency shell is disabled by default in Kicksecure for security reasons.![]()
This is implemented in file
/etc/default/grub.d/41_recovery_restrict.cfg![]()
.
To re-enable the dracut emergency shell, which can be useful for debugging, see wiki chapter Recovery Mode.
related forum discussion:
Virtual Consoles
[edit]An easier and more lightweight solution as alternative to recovery mode might be virtual consoles. If the graphical user interface is no longer starting, login to a virtual console might still be possible.
1. Prerequisite knowledge: Virtual Consoles.
2. Try to log into a virtual console in a different, still functional VM (virtual machine) as an exercise.
3. If that works, try to log into a virtual console in the broken VM.
Hard Drive Recovery
[edit]Depends on the case, if
- A) No data needs recovery: If no data needs to be recovered, a Factory Reset might be easier.
- B) Data recovery required: See below.
1. Choose unbootable host or virtual machine (VM).
Unbootable Host Operating System
If the host becomes unbootable due to hard drive issues:
2. Damage control: Stop using the hard drive. Further use might cause additional damage.
3. Make a full 1:1 raw clone of the hard drive.
Unbootable VM
If a VM becomes unbootable due to hard drive issues:
2. Damage control: Stop using the VM to prevent further damage.
3. Make a clone of the VM and/or hard drive.
4. Data recovery: Unspecific to Kicksecure.
Often, Boot from External Drive can help. This approach is useful because it bypasses the broken, non-booting operating system. Instead, you boot into a different, fully functional operating system, which can then be used to recover your data.
Boot from External Drive
[edit]
This is useful for data recovery, Grow Virtual Harddisk, Shrink Virtual Harddisk, or installing a new operating system.
Which ISO to use? The Kicksecure ISO should be suitable for these purposes.
Host Operating System
Note: You need to burn a Kicksecure ISO on an external Flash or DVD before proceeding with the below steps.
1. Insert the bootable Flash or DVD into your PC.
2. Restart your computer if it's already on. If it's off, turn it on.
3. During the boot process, a message will typically appear on the screen telling you to press a specific key to enter the BIOS/UEFI setup. Common keys are F2, F12, Delete, or Esc.
4. Once inside the BIOS/UEFI, look for a section related to "Boot Order" or "Boot Priority" (use the keyboard to navigate).
5. Set the Flash or DVD drive as the first boot device. This tells your computer to try booting from the Flash or DVD drive before any other devices.
6. After setting the boot order, find the option to Save Changes and Exit. The exact wording might vary, but it’s typically something like "Save & Exit" or "Exit Saving Changes." Confirm your changes, and your PC will restart.
7. If everything is set correctly, your PC should now boot from the Flash or DVD. You might see a message like "Press any key to boot from CD/DVD..." If you see this message, press any key on your keyboard to start booting from the DVD.
8. Done.
VirtualBox
Booting a Debian-based VirtualBox VM (such as Kicksecure or Whonix, which are derivatives based on Debian) using an ISO file instead of the internal disk involves changing the boot order and attaching the ISO file as a virtual CD/DVD drive.
Here are the steps to do this:
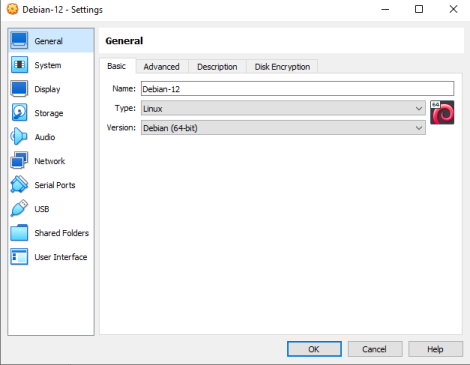
1. Launch VirtualBox from your applications menu. In the VirtualBox Manager, click on the VM that you want to boot from an ISO, then click on the "Settings" button (a gear icon) at the top.
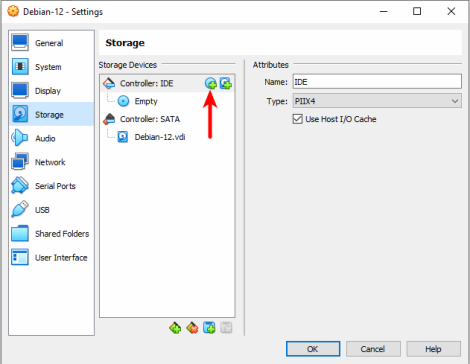
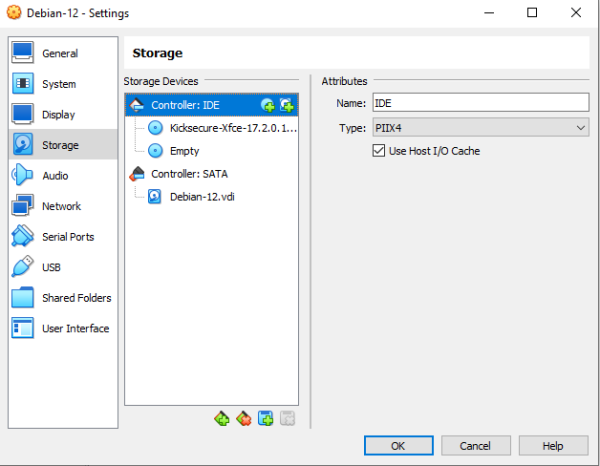
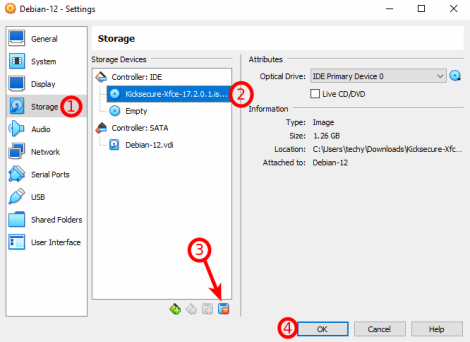
2. Configure Storage: In the Settings window, go to the "Storage" tab. You will see a tree structure with a controller (like IDE or SATA) and attached storage devices. Click on the CD/DVD drive icon with a "+" symbol attached to it.
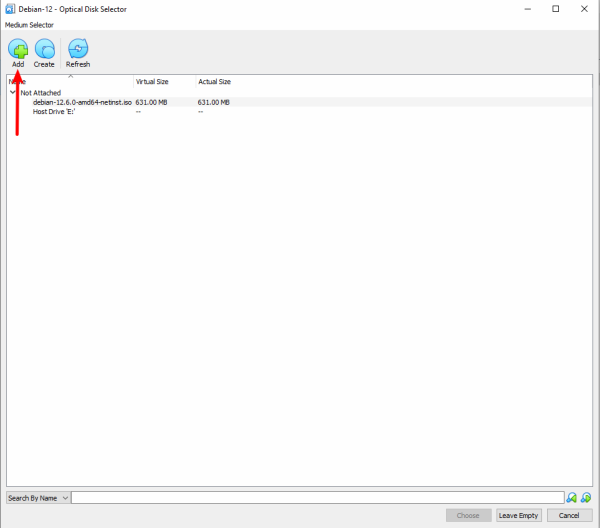
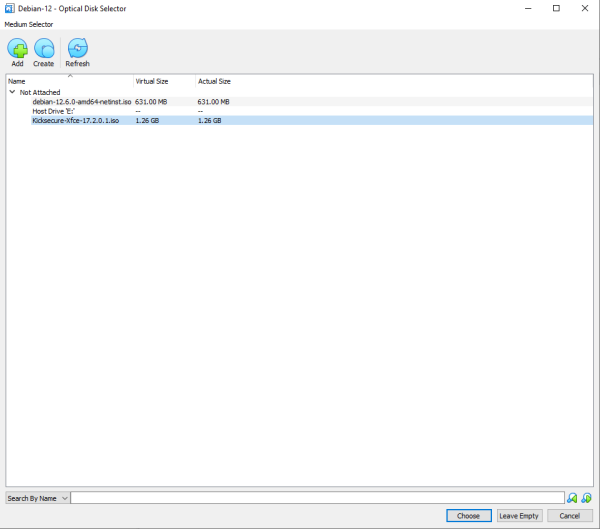
3. Add ISO File: On the top right corner of the window, you will see an icon of a CD/DVD. Click on this icon. Navigate to the location of your ISO file on your host machine. Select the ISO file, then press "Choose". The ISO file should now be attached to the VM as a virtual CD/DVD drive.
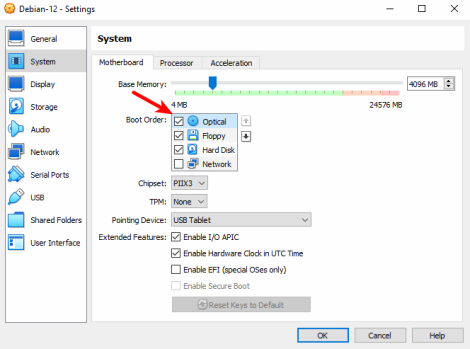
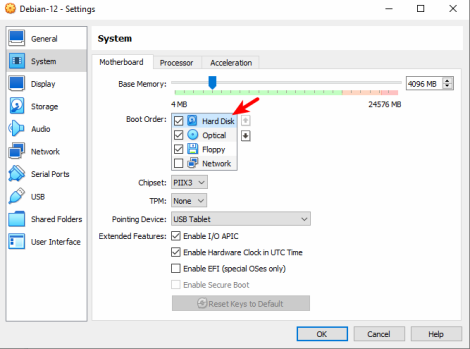
4. Configure Boot Order: Go to the "System" tab in the Settings window. Click on the "Motherboard" tab within the System settings. In the "Boot Order" section, ensure that "Optical" is checked and listed above "Hard Disk." You can reorder them by dragging or using the up/down arrows. Then click "OK" to save the settings.
5. Save and Start VM.
6. Complete Your Task.
- Proceed with your intended task (installation, recovery, etc.) using the booted ISO.
- Once you've finished and no longer need to boot from the ISO, shut down the VM.
7. Detach ISO After Use: After the VM has been powered off, go back to the "Storage" tab in the VM settings. Click on the ISO file that you previously attached. Click on the CD/DVD icon on the right and choose "Remove disk from virtual drive."
8. Revert Boot Order (if needed): Go to the "System" tab in the Settings window. Click on the "Motherboard" tab within the System settings. In the "Boot Order" section, ensure that "Hard Disk" is checked and listed above "Optical."
9. Done.
Your VM should now boot from the internal disk instead of the ISO file.
Troubleshooting:
- If the VM fails to boot from the ISO, ensure the ISO file is not corrupted and is compatible with your VM configuration.
KVM
Note: Kicksecure ISO downloaded in /home/user/Downloads on the host.
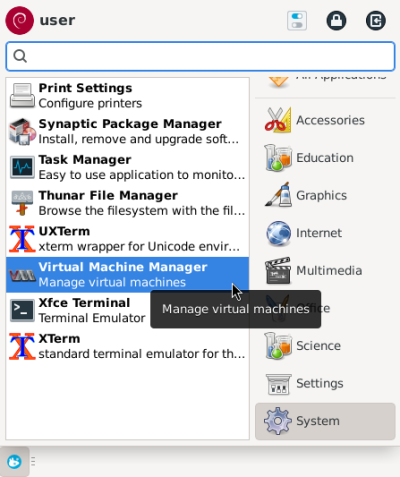
1. Launch KVM (called Virtual Machine Manager) from your applications menu.
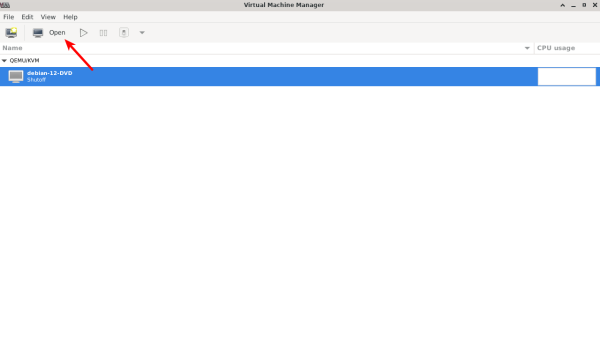
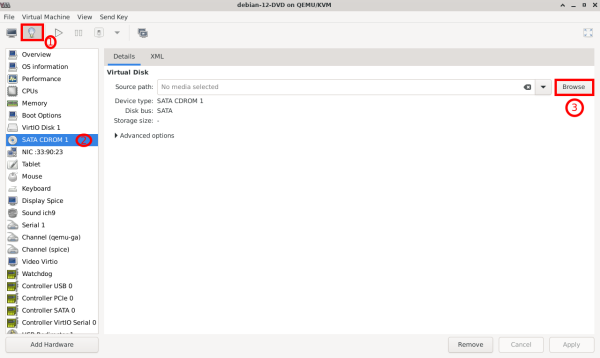
2. Click on the VM that you want to boot from an ISO, then click on the "Open" button (Monitor icon) at the top.
3. Click on VM settings (bulb icon), then "SATA CDROM 1", and then "Browse" to choose the ISO.
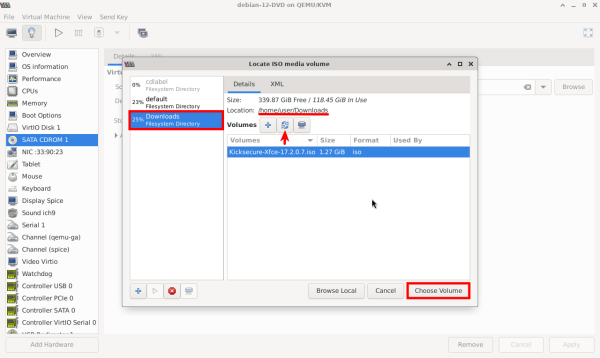
4. "Downloads" represents the path /home/user/Downloads where the ISO is located. If you click on it and find it empty, then click on the refresh icon. Next, select the ISO and press "Choose Volume".
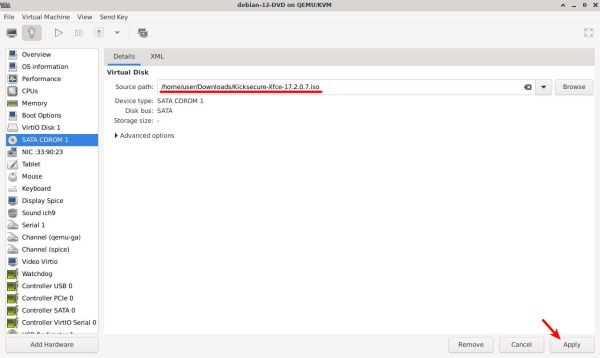
5. Make sure you have chosen the correct ISO, then click on "Apply".
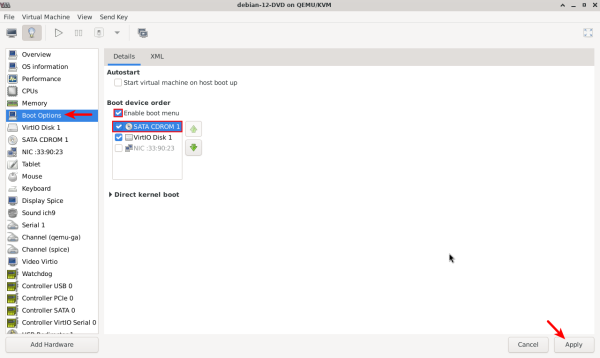
6. Press on "Boot Options", then tick "Enable boot menu", Tick and move up "SATA CDROM 1," and finally, press "Apply".
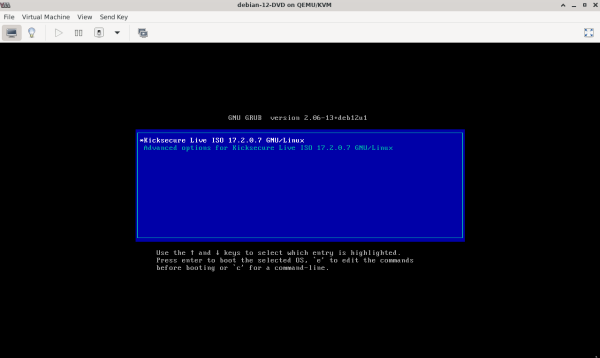
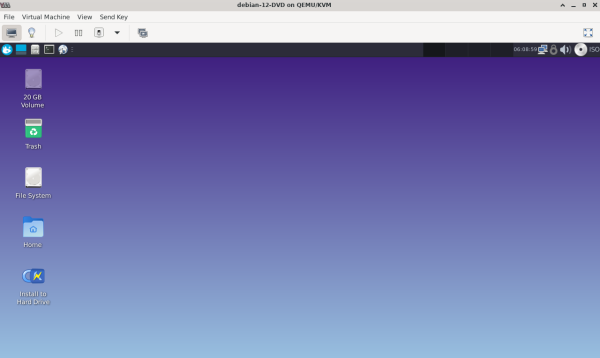
7. Run the VM, and it should boot the Kicksecure ISO.
8. If you want to go back to the original operating system, just revert the steps above.
9. Done.
Qubes
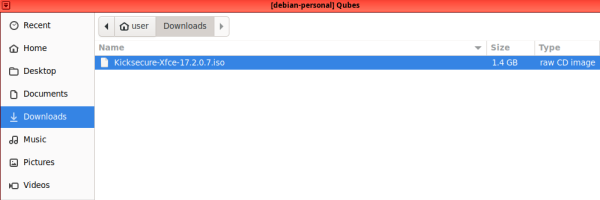
Note: You need to download the Kicksecure ISO into a separate AppVM/Qube that will be used to boot Kicksecure from (in the example below, the ISO has been downloaded in "debian-personal").
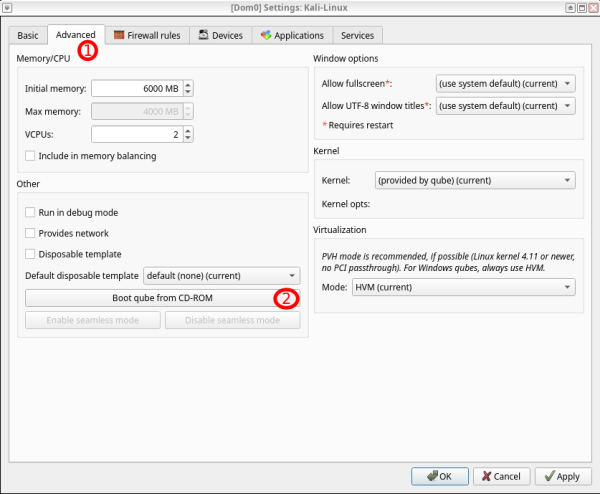
1. Launch "Qube Manager," click on the VM that you want to boot the ISO on (Kali-Linux StandaloneVM will be used as an example), then click on the "Qube Settings" button (a gear icon) at the top.
2. Click on "Advanced" then "Boot qube from CD-ROM"
3. Choose "from file in qube" then select your AppVM where you downloaded the ISO ("debian-personal" is used here) then Press "..." to choose the path of the downloaded ISO.
4. Choose the downloaded ISO from the AppVM path where you have downloaded it.
5. Make sure everything is as it should be, then press "OK".
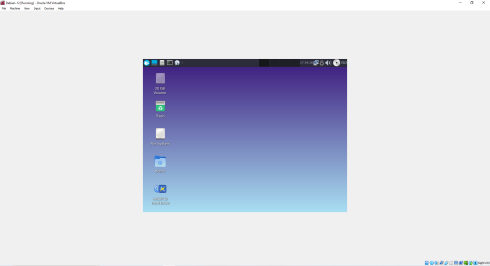
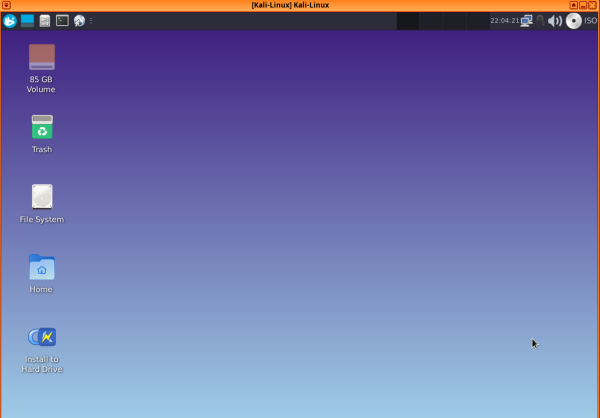
6. Kicksecure ISO should boot perfectly.
7. If you shut down Kicksecure live mode and reopen the VM, the ISO will be detached automatically, and the VM will boot the installed/default operating system.
8. Done.
Chroot
[edit]If an error occurs that prevents Kicksecure from booting, it is possible to chroot![]()
into Kicksecure from a live CD to fix the problem.
A bootable disk image must be downloaded for this purpose -- Kicksecure's ISO may be used for this purpose by booting the ISO into LIVE Mode | UNRESTRICTED Session | system recovery, install. Debian Live images![]()
or the Arch ISO
![]()
are also useful options for this procedure.
Use the Boot from External Drive instructions above to boot the VM or physical machine from the chosen disk image. After booting into the Live CD, follow these steps.
1. List the available drives and partitions.
fdisk -l
2. Mount the partition.
mount /dev/sda1 /mnt
Replace "/dev/sda1" with the drive partition name.
3. Chroot into the partition.
chroot /mnt /bin/bash
4. Optional: If the PATH variable is incorrect, it can be fixed with the following command.
source /etc/profile
Serial Console
[edit]1. Host preparation.
Install socat on the host operating system. The following steps apply to Linux distributions.
Install package(s) socat following these instructions:
1 Platform specific notice.
- Kicksecure: No special notice.
- Kicksecure-Qubes: In Template.
2 Update the package lists and upgrade the system.
sudo apt update && sudo apt full-upgrade
3 Install the socat package(s).
Using apt command line --no-install-recommends option is in most cases optional.
sudo apt install --no-install-recommends socat
4 Platform specific notice.
- Kicksecure: No special notice.
- Kicksecure-Qubes: Shut down Template and restart App Qubes based on it as per Qubes Template Modification.
5 Done.
The procedure of installing package(s) socat is complete.
2. VM preparation.
Inside the Kicksecure virtual machine where you want to enable the serial console, install the serial-console-enable package.
Install package(s) serial-console-enable following these instructions:
1 Platform specific notice.
- Kicksecure: No special notice.
- Kicksecure-Qubes: In Template.
2 Update the package lists and upgrade the system.
sudo apt update && sudo apt full-upgrade
3 Install the serial-console-enable package(s).
Using apt command line --no-install-recommends option is in most cases optional.
sudo apt install --no-install-recommends serial-console-enable
4 Platform specific notice.
- Kicksecure: No special notice.
- Kicksecure-Qubes: Shut down Template and restart App Qubes based on it as per Qubes Template Modification.
5 Done.
The procedure of installing package(s) serial-console-enable is complete.
Installed by default would be nice but it is not installed by default due to an issue. Namely, when enabling a serial console while none is connected, the systemd journal gets spammed with errors.![]()
3. Platform specific.
Choose host operating system, VirtualBox or KVM.
Host Operating System
Undocumented. It is advised to research these using a non-Kicksecure VM such as Debian trixie and learn it in a generic way which could then also be applied to Kicksecure.
VirtualBox
Read Only Serial Console
This option is very useful for capturing diagnostic output from a virtual machine. It allows a log of everything written to the kernel console to be obtained -- all console output is written to a plain text file from boot until shutdown. The logfile persists after VM shutdown, but is overwritten after the VM is shutdown and powered on again.
1. Enable the serial ports option.
Kicksecure VM settings → Serial Ports → Tick enable
Configure the following settings:
- Port Number:
COM1(default) - Port Mode:
Raw File - Path/Address:
/home/user/vbox-raw-file
2. View the file with a text editor.
Any text editor can be used for this purpose. For example to view the file with Featherpad, run.
featherpad /home/user/vbox-raw-file
3. Optional: View the file as it is being appended to from a terminal emulator.
The logfile is also compatible with other standard Linux utlitites such as tail. To view it as it is being written, run.
tail -f /home/user/vbox-raw-file
4. Retain the file contents.
After VM shutdown it may be useful to retain its contents by copying the vbox-raw-file elsewhere to make it a persistent log file. If this is desirable, run.
cp /home/user/vbox-raw-file /home/user/vbox-console-log
Interactive Serial Console
This procedure does not yet work during the grub boot menu.
1. Enable serial ports on the host.
Kicksecure VM settings → Serial Ports → Tick enable
Configure the following settings:
- Port Number:
COM1(default) - Port Mode:
Host Pipe - Option: uncheck
Connect to existing pipe/socket - Path/Address:
/home/user/vbox-socket-file
2. Connect to the relevant unix domain socket file.
On the host, run the following socat command to connect to the unix domain socket file which is connected to the operating system running inside the virtual machine. [5]
socat - UNIX-CONNECT:/home/user/vbox-socket-file
Depending on when the above command is run, nothing might appear. The reason is an interactive serial console will only show messages once connected to the serial console; old messages cannot be viewed that way. If the above command is run during early boot, then verbose messages will appear during boot. However, if you press Enter that should result in the virtual console asking for authentication.
3. Log in to the Kicksecure session.
Press Enter. The following prompt will appear.
host login:
Do not enter your host login username! Enter your Kicksecure user login name, which is most likely user. Press Enter. The following prompt will appear.
Password:
Enter the password for that user account; see Default Passwords. Press Enter.
Warning: the password will not be hidden by asterisk ("*") symbols. In other words, the password will be written in cleartext and could be read by anyone looking over your shoulder.
Also note that root logins are not possible by default.
Forum discussion: https://forums.whonix.org/t/serial-console-in-virtualbox/8021![]()
KVM
See KVM, serial console.
Wiki TODO: documentation needs to be ported here from https://www.whonix.org/wiki/KVM#Command_Line_Interface_.28CLI.29![]()
Kicksecure specific
[edit]Enable the Serial Console.
Write to serial console by writing to the appropriate serial console device. [6]
Write dmesg to serial console.
dmesg > /dev/ttyS0
Qubes specific
[edit]Non-Bootable Qubes VM
[edit]This is unspecific to Kicksecure. Therefore the primary contact of support must be the Qubes community, not Kicksecure.
Always have a full, tested (can be restored) backup first before proceeding. A lot of the following ideas are undocumented.
Ideas:
- A) Set the broken VM's NetVM setting to "none" (optional), change to a different Template (perhaps a re-installed Template).
- B) Can a Qubes VM be booted from a virtual ISO? (Such as for example the Kicksecure ISO?
- C) Can a Qubes VM be booted into recovery mode?
- D) Show full console window ("desktop") of Qubes VM by using Qubes "debug mode"?
- E) Can Qubes boot from a different VM, assign the other VMs virtual hard drive, mount it, make changes to fix it, unmount it, assign back to original VM and boot it? -> https://www.qubes-os.org/doc/mount-lvm-image/

- F) If the Qubes
/rw/rc.localmechanism is broken inside the VM:- Boot the Template, disable Qubes' mechanism to process
/rw/rc.local. - As a hack, an early running systemd unit configured in the Template could delete
/rw/rc.localat VM startup before Qubes processes it.
- Boot the Template, disable Qubes' mechanism to process
Unlock User Account: Excessive Wrong Password Entry Attempts
[edit]See: Unlock User Account: Excessive Wrong Password Entry Attempts.
Reset User Account Password
[edit]See Reset User Account Password.
See Also
[edit]Footnotes
[edit]- ↑
For Qubes, see: https://www.qubes-os.org/doc/mount-from-other-os/

- ↑ See also: Default Passwords.
- ↑
If an error like the following appears.
Failed to open a session for the virtual machine Kicksecure-LXQt_18.0.0.4.9.
NamedPipe#0 failed to connect to local socket /home/user/vbox-socket-file (VERR_FILE_NOT_FOUND).
Result Code: NS_ERROR_FAILURE (0x80004005)
Component: ConsoleWrap
Interface: IConsole {872da645-4a9b-1727-bee2-5585105b9eed}
Then you must uncheck
Connect to existing pipe/socket. - ↑ vboxmanage modifyvm Kicksecure-LXQt --uart1 0x3F8 4 --uartmode1=server /home/user/vbox-socket-file
- ↑ socat - UNIX-CONNECT:/home/user/vbox-socket-file
- ↑
To find the serial console.
dmesg
(nothing helpful)
dmesg
Found
/dev/ttyS0. Test write. echo test > /dev/ttyS0

We believe security software like Kicksecure needs to remain Open Source and independent. Would you help sustain and grow the project? Learn more about our 13 year success story and maybe DONATE!


